Showing posts with label crafty individuals. Show all posts

Tuesday, 19 August 2008

Prezzies Galore from FDF and Melt Pot Experiments!

I couldn't see my Freaky Deaky Friendie until today (mwah!) but we had a Melt Pot Party! Yeah! First though, wow, I got prezzies galore (I told her off for getting so much but she never listens - talk to the hand lol!)

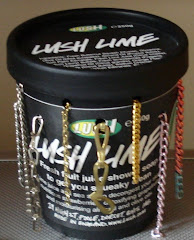
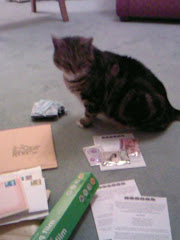
Lookie at the piccie! A Mimi mini mini mini tote (sooooooooo cute), which was just the bestest surprise ever! I also got some rubber stamps that I have been dying to own! Hero Arts Create collage stamp, 2 Crafty Individuals Stamps (little girl in Paris and an Oriental lady - yes I am bonding with Oriental and my FDF is being very supportive of this lol!).

Also in my pile of prezzies there are packets of jute and co-ordinating paper covered wire, metal embellishments, metal distressed word charms, glitzy heart beads, Queen&Co. mini brads (funky-wunky ones) and my fave kind of eyelets, adonised ones! As if that wasn't enough (naughty FDF spending so much money) I also got a pack of Diddl pens which are the best Diddl pens you can get 'cos they write in different colours.

It took a fair while to open all those gifties!

My FDF bought her melt pot along for our melt pot party, and we played! FDF melted was in hers, I farted round with UTEE etc. This shows my melt pot which has clear UTEE, a sprinkle of the flex, the green and yellow UTEE Brightz and a sprinkling of white UTEE... lusherly colours, all marbling and melting into each other, with a little help from the spatula that came in my toolz set (don't rate the tweezers/spoon tool do we FDF?!)

Melting Moments...

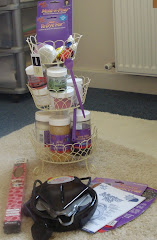
Here's a piccie of all the bits and bobs we created between us. We tried dipping and then stamping into corrugated cardboard, which had some fab effects! We also used some molds that I had - a face, butterflies, and a flower button - we were dead chuffered at how these came out - the finished effect of poured UTEE that has set is soooooooooo smooth... like a boiled sweetie!

All Our Bits and Bobs!

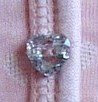
We also tried dipping punched circles from an egg carton and stamping into them and that effect was molto magic. Because the stamp we used was quite intricate, the pieces look like a real sea sponge texture. Top notch! One piece we left plain 'cos it looked too pretty to stamp into!

Dipped Egg Carton Circles

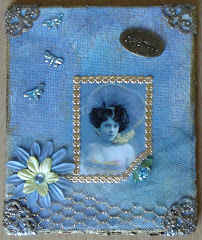
A most successful Melt Pot Party! Watch this space for more from me and my Melt Pot lol! I need to give him a name... suggestions on a postcard lol! Melvin? Michael? Mickey?

Ooh, and I got another New Home ATC (from Kathleen, my crafts blog - check it out, it's on my blog list)

New Home ATC

Wednesday, 13 August 2008

What's Black and White and...

Q: What is black and white, white and black, black and white?
A: A zebra caught in a revolving door!!!

OK, apologies for the really poor attempt at humour there, but it was the only black and white joke I could think of right now!

Swiftly moving on, Black and White is a theme for ATC Addicts R Us this month, so I took the bull by the horns and got creating! I already had some stamped acetate images ready with this swap in mind (Crafty Individuals and some other company I cannot remember right now!)

First ATC, Flower Girl, I cut along the shaped side of the image and attached a strip of lace paper (see the texture peeking out the right hand side?) I then used diamond glaze to glue the image onto a piece of DCWV backing paper (black and white stack - sunflowers) hoping that the petals of the sunflowers look like layers of her dress... does that work?

Kind of... anyways, I inked the edges and matted and layered onto white and then black card. To embellish, I used versamark and black and white embossing powders to colorise 2 die cut flowers, and layered them up on the bottom right hand corner, attaching a pearl flower in the centre and a mini micro brad. I added a teeny weeny pearl flower to the image in her hair, and a teeny weeny fabric flower to her dress - onto this one I popped a black gem, and then to finish I attached a few more gems in the centre of the flowers on the stamped image.

Flower Girl

This next ATC, Girls Night Out, was such fun to make! I placed the image over some handmade paper and some lace - I think it looks really cool, like the lace is the top of the girls' dresses! All this needed was matting and layering and a few finishing touches. I added wire and beads down the left hand side, and a tiny star button up the top. Melikes! (I don't say that often!!!)

Girls' Night Out

Actually, melikes this next ATC too (what happened to self doubt?! Maybe it decreases the nearer you get to 30?!) I love this Pierrot image, it seemed to fit perfectly within the black and white theme. I layered it onto handmade paper, then onto black card, adding 3 brads over buttons on the image to help hold the acetate in place. I attached the word "Pierrot" using diamond glaze, and embellished with a pinwheel sequin, pearl flower and mini micro brad. The harlequin style lace down the left hand side adds a bit of texture and interest!

Pierrot

Thursday, 7 August 2008

On a roll!

My second and final gothic arch is completed for the swap on ATC Addicts R Us.

So what did I add to this Crafty Individuals based background that I created last week with Mumsy? Well, I stamped some teeny weeny swirls in gold, attached a wire coil/ribbon to the bottom left hand corner, then, using wire, attached beads all the way around the arch (quite time consuming but defo worth it).

I used diamond glaze to accent the white butterflies on the background paper, then added 2 glittery flutterby stickers (will never forget how these came to be in my possession - they were a bonus item with one of my first orders from 3D Jean way back when). I gave both of these butterflies antennae (could resist!) Finally I added my alcohol inked metal butterfly, then, some wire coils and a sequin butterfly to take the design off the arch... I think this is my fave of the 2 Gothic Arches I have made. But I keep changing my mind (a girls' perogative!)

To Those That Dream There is no Such Place as Faraway

Ahhhhhh! There was no stopping me then. I grabbed the 4 jumbo playing cards (an extra swap currently running on UKATC) sent to me by Paula, and started creating backgrounds and generally getting all painty!

I used one of Bernie Berlin's techniques on the 2 on the left hand side, "resin fresco" - used Adirondack dabbers over randomly sprinkled and heated UTEE and a couple of brush strokes of gesso. Interesting effect, think it has to be seen in the flesh, or at least very close up, to see the real texture created using that technique.

Backgrounds for Jumbo ATC Swap

On the other 2 backgrounds (on the right hand side of the piccie above) I used watered down acrylic paints brushed on over a layer of gesso (just to prime) and then I scrunched up clingfilm and placed it over the top. When I lifted off the clingfilm, I wanted a bit more of a sheen, so a added a few drops of luna lights and repeated scrunched clingfilm part. Looks kinda marbled, pretty cool! It's amazing what you can do with Morisson's mucho cheap clingfilm!

Rather liked doing that kind of background, so whilst I was all messy, thought I would do a couple on regular sized ATCs too, for future creations!

Acrylic Paint, Luna Lights and Clingfilm

When all is said and done, a very productive day indeedy!

Friday, 1 August 2008

Coasting!!!

Finally my finished Altered Coaster for a swap on Advanced Artist Trading Cards have been completed and sent off in the post! Backgrounds were all done using Bernie Berlin's background technique "emboss resist", then, the theme being numbers, I had to pick my fave no... 2! (no rude jokes please!)

The harlequin background on this coaster gave me a great starting point, and it was easy to choose an image for it - this one is stamped onto acetate, and I had layered 3 strips of mulberry paper underneath, to add a bit of depth to the image. I cracked open a packed of "diamond" Ranger pop outs that I have been hoarding for some time, and used B-Muse embossing powders on them, and then swiped round the edge of the coaster with versamark and used the same colour embossing powder as I had done on the pop outs. Beaded chain around my no.2 and around the diamonds, plus a few diamante stars, and this one was completed!

2 Little Angels

The next coaster was a bit tricky-wicky, as it was the first time I had used my crop-a-dile to attach organza ribbon onto a surface with eyelets. I didn't want to spoil ye olde coaster, and fortunately, after a bit of faffing, I got the effect I was after. Added some velvet ribbon too, for a bit of touchy feely-ness. The no.2 and edge of the coaster have B-Muse embossing powders on them, and the no. is attached with 4 teeny tiny "screw head" brads. I alcohol inked a round frame from The Fruit Pixie, and attached it over my chosen image with brads. A touch of bling was needed to finish off, so I applied gems, beads and wire to complete the coaster.

2 Hearts Beating as 1

This is my secone fave coaster out of the four I made. Image is crafty Individuals, a little ric rac down one side (thank you FDF for your advice!) and interlocked the image into a die cut swirl that I had embossed with, yup, you got it, B-Muse embossing powders (and the edge of the coaster too!) Alcohol inked a washer and a button, using the washer to frame my no. and the button as an embellishment. Completed my chosen phrase "2gether" (not good English I know - but I think it looks good on arty farty stuff) The finishing touch was a flower from a sheet of prima flowers sent to me as an RAK by a member of the group ATC Addicts R Us (thank you!)

2-gether

My most favourite coaster of all... really hard to part with this one, yet I didn't like it at first! How odd... Anyway, attached some vintage lace using some large eyelets, tucking my image (Crafty Individuals) underneath on one side. Added my phrase "IT TAKES" and my no. 2, and used gold trim under both the no. and the image. Used some pink gems to create a corner on the top right, attach these with wire (unusual gems these, they have 2 holes on the top). Finishing touch, attaching some musical note charms with wire, twisted this way and that.

It Takes 2 (to Tango)

If no one wants this one in the swap... I wonder if I could have my own back?!

Starting Gothic Arches (and Invasion of the Midges - Eurgh!)

Today I have been invaded by midges - eeeeewwwwwwwww! Horrible little black dots, not content with covering my windowsills, there decided to venture further onto my lounge walls *shudder* After an initial panic, I gritted my teeth, sprayed them with fly spray, then took a hot damp cloth and wiped all the walls and windowsill. Mumsy was coming over for a craft afternoon, and I hadn't prepared anything cos of the darned Invasion of the Midges.

But didn't matter, we still got crafting, both of us wanting to start on the Guest Hostess swap for ATC Addicts July/August which is Gothic Arches - Butterflies :) Both of us need to add finishing touches, but here are are works in progress...

Mumsy

She did her best to utilise all resources available here lol! Left background paper is HOTP, right background paper is DCWV. Mumsy added some paper lace, and a trim to both arches along the bottom edges. On the left one, she used some quilled butterflies (Lakeland I think) as well as some sequin flowers, butterfly, and gems. On the right one, she used a couple of K&Co. grand adhesions, more sequin flowers, butterflies and gems. I think she plans to finish them off with a bit of colour around the edge and some ribbon. I wonder if she will see I have put these up on here for all to see...?!

Freaky Deaky Crafty Chick (me!)

I, meanwhile, did my best to utilise the HOTP stamps Mumsy owns that I had asked her to bring with her! Left background paper is Crafty Individuals, right background paper is... hand on, gotta find the pad ad its not one I have used often because the papers are so lush... OK it's Tapestry by C.R. Gibson. Hmm... there is a website on the back... http://www.tapestrybycrgibson.com/

I over stamped the papers using Mumsy's stamps and gold embossing powder. Added lace trim to both arches along the bottom edges. On the left one, I have added a phrase that was printed off onto vellum, and on the right one, I have added a phrase that was printed onto paper. Inked both phrases and chopped them up into individual words so I could place them around the arches to create a frame. Alcohol inked a couple of metal butterflies (recent purchase from ebay!) but haven't stuck them down yet... not sure how mine will be finished off, but... I never let a butterfly rest on my work if I haven't made antennae from wire and beads!!!

Butterfly away from me
Seek happiness while you can
Before you’re trapped in this golden cage
Of pain and loneliness, like I am.

Tristan K. Jones

I didn't use this particular poem, but it is one I like, so I thought I would add it in here just because...

Oh, and by the way, butterflies are better than midges any day of the week!

Thursday, 24 July 2008

New Address Cards and My Bunny Wabbit

I felt uber creative this evening (and I couldn't sleep) so I made a set of new address cards to send to various relatives. Kept them simple - stamped backgrounds (on the left hand side ones I have used Prima stamps, on the right hand side ones Crafty Individuals) Matted and layered onto 2 further pieces of card picking out colours from the skeleton leaves used on the front. I have had those kicking around for a good couple of years, not really knowing what to do with them, so took this opportunity to break open the packet and use them! Stamped "new address" onto vellum and attached over with lickle flower brads. Very therapeutic!

New Address Cards

I may have had to leave (not so) little Oscar behind with my parents, but I have a new pet (well, ish!) A bunny wabbit - I have named him Robbie) keeps coming out early morning and early evening to chomp at the grass outside my lounge window. Today, however, he actually was out during the day (maybe because it was so hot?) and he lounged around on the grass for a few hours under some little bushes...

Robbie the Rabbit


He's not dead, just sleepy... aaaahhhhhhh!

Friday, 11 July 2008

Finshed!

Added "Paris" word charm and ribbon to the lid...

Added pearly buttons to the bottom half...

Attached my Eiffel Tower tag with ribbon...

Ta da!!!

Wednesday, 9 July 2008

Treasure Box Commences!

Backtracking - 2nd July 2008

Finally got started on my Treasure Box swap for Advanced Artist Trading Cards. Off to Paris again (can't I think of anything new and innovative?!) but I do love using my Crafty Individuals stamps, and know I have lots of embellishments that tie in with the theme of Paris, so as this was my first swap for Advanced ATCs, I wanted to be in my comfort zone and feel confident (well, as confident as Freaky Deaky Crafty Chick ever can!) in my ability to create something half decent!

After priming with gesso, I used 3 shades of Adirondack paint dabbers to colourise the box all over, in a random fashion, til I had something which I was satisfied with. Then I stamped using Stazon and my favourite Crafty Individuals rubber stamps (text, friends in Paris, Paris postmark) onto tissue paper, and used modge podge to apply them onto the lid of the box, layering and overlapping.

Not actually very happy with the way the word "friends" cannot be seen easily at all. Will figure that out another day, in fact, I will probs end up covering it up with something. But what..?

Thursday, 26 June 2008

Addicted to Canvas

Backtracking - 1st June 2008


Went to Paris (only in my mind that is!) and created a canvas for a friend's birthday - she be learning French so she can speak it fluently as part of her job, so I thought what better gift?! I was chuffed with the effect of embedding the eiffel tower (the charm, not the actual towers itself lol!) into a tag containing heated pearl UTEE - and the trickery of dealing with UTEE flying round the room convinced me I *need* a Melt Pot. Let's hope the birthday fairy makes my dreams come true!