Showing posts with label alcohol inks. Show all posts

Thursday, 7 August 2008

On a roll!

My second and final gothic arch is completed for the swap on ATC Addicts R Us.

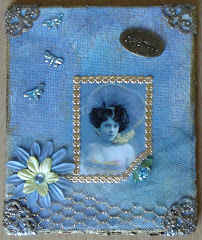
So what did I add to this Crafty Individuals based background that I created last week with Mumsy? Well, I stamped some teeny weeny swirls in gold, attached a wire coil/ribbon to the bottom left hand corner, then, using wire, attached beads all the way around the arch (quite time consuming but defo worth it).

I used diamond glaze to accent the white butterflies on the background paper, then added 2 glittery flutterby stickers (will never forget how these came to be in my possession - they were a bonus item with one of my first orders from 3D Jean way back when). I gave both of these butterflies antennae (could resist!) Finally I added my alcohol inked metal butterfly, then, some wire coils and a sequin butterfly to take the design off the arch... I think this is my fave of the 2 Gothic Arches I have made. But I keep changing my mind (a girls' perogative!)

To Those That Dream There is no Such Place as Faraway

Ahhhhhh! There was no stopping me then. I grabbed the 4 jumbo playing cards (an extra swap currently running on UKATC) sent to me by Paula, and started creating backgrounds and generally getting all painty!

I used one of Bernie Berlin's techniques on the 2 on the left hand side, "resin fresco" - used Adirondack dabbers over randomly sprinkled and heated UTEE and a couple of brush strokes of gesso. Interesting effect, think it has to be seen in the flesh, or at least very close up, to see the real texture created using that technique.

Backgrounds for Jumbo ATC Swap

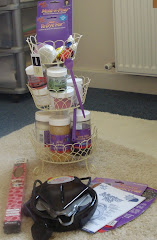
On the other 2 backgrounds (on the right hand side of the piccie above) I used watered down acrylic paints brushed on over a layer of gesso (just to prime) and then I scrunched up clingfilm and placed it over the top. When I lifted off the clingfilm, I wanted a bit more of a sheen, so a added a few drops of luna lights and repeated scrunched clingfilm part. Looks kinda marbled, pretty cool! It's amazing what you can do with Morisson's mucho cheap clingfilm!

Rather liked doing that kind of background, so whilst I was all messy, thought I would do a couple on regular sized ATCs too, for future creations!

Acrylic Paint, Luna Lights and Clingfilm

When all is said and done, a very productive day indeedy!

The Holiday is Over; 1 down 1 to go!

Hooray, hooray, it's a holi-holi-day! Done and dusted, 4 Holiday/Vacation Themed ATCs, 3 of which will go in for the ATC Addicts R Us themed swap for August. The other one... aha!

Anyways, to each ATC I chose an image from either the "funnies" or "travel" ATC paper pads, adding colour using direct to paper technique, to lift them up off the background. Also added 4 fancy corners to make each image look like a snapshot from a holiday photo album.

Got Tuna?

Attached the phrase "Got Tuna?" with mini micro brads, adding a fish charm (thank you FDF!) which I had alcohol inked. Final touch, a wavy peel off (yup, you read that right, a *peel off*!!!)...

Memories

Added an alcohol inked metal plaque - memories - and some rustic looking gold glass chips, to create the effect of a pebble beach...

Dip Your Toe In

Added a windsurfer charm which had been alcohol inked, attaching it with a brad. Another wavy line peel off (am I feeling alright?!) and this one was done!

The Gene Pool

My favourite I think - attached an alcohol inked sea conch charm using a mini micro brad, and added the phrase "The problem with the gene pool is that there is no lifeguard" - the final touch was a few of those rustic gold glass chips.

And, hip hip hooray, 1 down 1 to go - I have completed one of my gothic arches. I was drawn to them as soon as I woke up, so took advantage and got cracking with finishing one off.

So what have I added to what was once a mere background? 2 stamped images of teeny weeny flutterbies in spring pansy, coating the images with diamond glaze. I also stamped teeny weeny swirls in gold, attached a wire coil/ribbon to the bottom left hand corner, then, using wire, attached tiny lilac sequin flowers all the way round the arch so they kinda hang off - added a bit of ribbon to one of them. I bedazzled up the dark butterfly images on the backround paper using, those things I can never remember the name of... accent beads!!! I also gave both of these butterflies antennae (could resist!) Finally I added my alcohol inked metal butterfly and voila!

The Master Calls a Butterfly

Friday, 1 August 2008

Coasting!!!

Finally my finished Altered Coaster for a swap on Advanced Artist Trading Cards have been completed and sent off in the post! Backgrounds were all done using Bernie Berlin's background technique "emboss resist", then, the theme being numbers, I had to pick my fave no... 2! (no rude jokes please!)

The harlequin background on this coaster gave me a great starting point, and it was easy to choose an image for it - this one is stamped onto acetate, and I had layered 3 strips of mulberry paper underneath, to add a bit of depth to the image. I cracked open a packed of "diamond" Ranger pop outs that I have been hoarding for some time, and used B-Muse embossing powders on them, and then swiped round the edge of the coaster with versamark and used the same colour embossing powder as I had done on the pop outs. Beaded chain around my no.2 and around the diamonds, plus a few diamante stars, and this one was completed!

2 Little Angels

The next coaster was a bit tricky-wicky, as it was the first time I had used my crop-a-dile to attach organza ribbon onto a surface with eyelets. I didn't want to spoil ye olde coaster, and fortunately, after a bit of faffing, I got the effect I was after. Added some velvet ribbon too, for a bit of touchy feely-ness. The no.2 and edge of the coaster have B-Muse embossing powders on them, and the no. is attached with 4 teeny tiny "screw head" brads. I alcohol inked a round frame from The Fruit Pixie, and attached it over my chosen image with brads. A touch of bling was needed to finish off, so I applied gems, beads and wire to complete the coaster.

2 Hearts Beating as 1

This is my secone fave coaster out of the four I made. Image is crafty Individuals, a little ric rac down one side (thank you FDF for your advice!) and interlocked the image into a die cut swirl that I had embossed with, yup, you got it, B-Muse embossing powders (and the edge of the coaster too!) Alcohol inked a washer and a button, using the washer to frame my no. and the button as an embellishment. Completed my chosen phrase "2gether" (not good English I know - but I think it looks good on arty farty stuff) The finishing touch was a flower from a sheet of prima flowers sent to me as an RAK by a member of the group ATC Addicts R Us (thank you!)

2-gether

My most favourite coaster of all... really hard to part with this one, yet I didn't like it at first! How odd... Anyway, attached some vintage lace using some large eyelets, tucking my image (Crafty Individuals) underneath on one side. Added my phrase "IT TAKES" and my no. 2, and used gold trim under both the no. and the image. Used some pink gems to create a corner on the top right, attach these with wire (unusual gems these, they have 2 holes on the top). Finishing touch, attaching some musical note charms with wire, twisted this way and that.

It Takes 2 (to Tango)

If no one wants this one in the swap... I wonder if I could have my own back?!

Starting Gothic Arches (and Invasion of the Midges - Eurgh!)

Today I have been invaded by midges - eeeeewwwwwwwww! Horrible little black dots, not content with covering my windowsills, there decided to venture further onto my lounge walls *shudder* After an initial panic, I gritted my teeth, sprayed them with fly spray, then took a hot damp cloth and wiped all the walls and windowsill. Mumsy was coming over for a craft afternoon, and I hadn't prepared anything cos of the darned Invasion of the Midges.

But didn't matter, we still got crafting, both of us wanting to start on the Guest Hostess swap for ATC Addicts July/August which is Gothic Arches - Butterflies :) Both of us need to add finishing touches, but here are are works in progress...

Mumsy

She did her best to utilise all resources available here lol! Left background paper is HOTP, right background paper is DCWV. Mumsy added some paper lace, and a trim to both arches along the bottom edges. On the left one, she used some quilled butterflies (Lakeland I think) as well as some sequin flowers, butterfly, and gems. On the right one, she used a couple of K&Co. grand adhesions, more sequin flowers, butterflies and gems. I think she plans to finish them off with a bit of colour around the edge and some ribbon. I wonder if she will see I have put these up on here for all to see...?!

Freaky Deaky Crafty Chick (me!)

I, meanwhile, did my best to utilise the HOTP stamps Mumsy owns that I had asked her to bring with her! Left background paper is Crafty Individuals, right background paper is... hand on, gotta find the pad ad its not one I have used often because the papers are so lush... OK it's Tapestry by C.R. Gibson. Hmm... there is a website on the back... http://www.tapestrybycrgibson.com/

I over stamped the papers using Mumsy's stamps and gold embossing powder. Added lace trim to both arches along the bottom edges. On the left one, I have added a phrase that was printed off onto vellum, and on the right one, I have added a phrase that was printed onto paper. Inked both phrases and chopped them up into individual words so I could place them around the arches to create a frame. Alcohol inked a couple of metal butterflies (recent purchase from ebay!) but haven't stuck them down yet... not sure how mine will be finished off, but... I never let a butterfly rest on my work if I haven't made antennae from wire and beads!!!

Butterfly away from me
Seek happiness while you can
Before you’re trapped in this golden cage
Of pain and loneliness, like I am.

Tristan K. Jones

I didn't use this particular poem, but it is one I like, so I thought I would add it in here just because...

Oh, and by the way, butterflies are better than midges any day of the week!

Sunday, 27 July 2008

Girly Wirly

I did something very brave today... I used... wait for it...

s-t-i-c-k-e-r-s !!!

Anyone who knows me, will understand how traumatic this was for me - I am not a sticker person - but with the theme of "Girly Stuff" I didn't have an awful lot of scope in my ever expanding craft stash to use.

And, this is perhaps wierd, (but then I am a Freaky Deaky Crafty Chick after all!) but I find stickers really difficult to use on my work. Give me a few stamps and I am off, but stickers... my head retreats into its shed!

Anyhoo, I managed to locate some rather flash stickers that I think were part of a QVC TSV that me and Mumsy shared, and they tied in perfectly with a set of 3 charms that my Freakie Deaky Friendie had given me to help me get started on this themed swap. Phewie! It took me a while, but they finally came together...

You can never have too many bags, hats or shoes!

Flirty Dress!

Posh Frock

These ATCs are fairly simple: wide piece of pink ribbon, mulberry paper over one corner (you know me and my corners!), the words fun and sassy (DCWV paper methinks), a length of tape measure (all us girlies know about measuring up!) and for the focal point... stickers *shudder*

Had to jazz them up with gems, fibers, flowers, and the final touch, thanks to my FDF, the charms! Which I faffed with of course, and alcohol inked them, attaching a ribbon through the loops before using brads to hold them in place on the ATCs.

Phew, that was pretty stressful. Especially as the deadline is Monday, and they are for ATC Addicts which I co-own with my FDF, and I still have waterfall ATCs to do! What with moving, somehow time for crafting got shoved aside for a while, then wham bam, I've got deadlines looming! Thank goodness my creative muse was by my side today :D

Wednesday, 23 July 2008

Bernie Berlin... again!

Had to take on the challenge and take part in the Bernie Berlin ATC swap on UKATC. I was able to use 3 different background techniques from her book for this swap :)

I used one of the backgrounds I created on 14th July

http://freakydeakycrafter.blogspot.com/2008/07/bernie-berlin.html

I found a suitable image, and once I had that, the rest just came together! A layer of mesh, some mulberry paper, star eyelets and star gems. Made my own little chipboard letters to spell out "lovers".

"Lovers" (emboss-resist)

My second ATC uses a background created waaaaaay back... maybe early 2007? This uses the technique "fun foam". I had glued foam hearts onto an ATC base, layering some up double, then covered with foil tape and alcohol inked over the top. Yet again, finding an image that fitted in with my background gave me a good starting point and just by adding wire/bead embellishments and a word (again, I created my own chipboard letters) this ATC was done and dusted.

"Possession" (fun foam)

My last ATC used the technique "inky layers" though with a little improvisation on my part - I didn't have a coloured glazing medium as suggested, substituting it with diamond glaze... I don't think it made a huuuuuge difference..? This one was fun to make up, using a bottle cap image from Digital Collage Downloads, creating a framey with flowers to lift the image off the background. Added my trademark mesh, and yet more handmade chipboard letters... I think this one is my fave... or maybe "Lovers"... or maybe "Possession"... or maybe... I am just too darned indecisive!!!

"Innocence" (inky layers)

You see, the thing with the techniques in Bernie Berlin's book is, that you don't need to add much to complete an ATC, mainly because you don't want to cover up your lush backgrounds! Anyone fancying a challenge or a change, I highly recommend her book, available on Amazon and all the other usual places!

Artist Trading Card Workshop by Bernie Berlin.

Tuesday, 1 July 2008

Button Moon

Backtracking - 22nd June 2008

I've been to button moon, I've followed Mr Spoon, button moon! (Hope some of you out there reading this remember that TV programme?!) Yup, you got it, buttons!

The challenge on ATC Addicts is "Button It" - I already had the faux washi backgrounds at hand and an idea in my head to use buttons to create frames... so all I had left to do was to find suitable images and buttons and get crafting! I wanted a variety of buttons on each card, so I could show all kinds of buttons you can not only buy but create yourself! My ATCs include ones such as:

  • miniature buttons
  • cats' eye buttons
  • shaped buttons
  • decorative buttons (ones with blue stars courtesy of Mumsy)
  • plain buttons I have colourised with alcohol inks
  • homemade buttons created using punched out shapes of shrink plastic
  • recycled buttons (from old clothes etc.)
  • buttons rec'd in an RAK from Twiggy (cheers big ears!)

The images are from one of the Crafty Individuals image books (think the one I used is called People and Places) and I matted them onto angel hair to soften the look slightly. I attached the buttons with wire (that took forever!) but I had all night... I needed words to finish off the ATCs, so searched through my stash and found these vellum words... and on a couple of the ATCs I added a lickle flower to make the images stand out more, then I was done! :D

I kept this one for me :)