

It's cheating really, because I used a K & Co kit. But Ickle Pickle doesn't mind!

 Woodware Clear Magic Stamps - Elegant Cameos


To Those That Dream There is no Such Place as Faraway
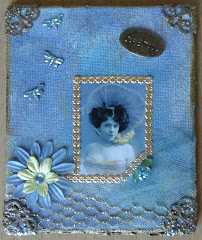
Ahhhhhh! There was no stopping me then. I grabbed the 4 jumbo playing cards (an extra swap currently running on UKATC) sent to me by Paula, and started creating backgrounds and generally getting all painty!
Backgrounds for Jumbo ATC Swap
On the other 2 backgrounds (on the right hand side of the piccie above) I used watered down acrylic paints brushed on over a layer of gesso (just to prime) and then I scrunched up clingfilm and placed it over the top. When I lifted off the clingfilm, I wanted a bit more of a sheen, so a added a few drops of luna lights and repeated scrunched clingfilm part. Looks kinda marbled, pretty cool! It's amazing what you can do with Morisson's mucho cheap clingfilm!

Got Tuna?
Attached the phrase "Got Tuna?" with mini micro brads, adding a fish charm (thank you FDF!) which I had alcohol inked. Final touch, a wavy peel off (yup, you read that right, a *peel off*!!!)...
Memories
Added an alcohol inked metal plaque - memories - and some rustic looking gold glass chips, to create the effect of a pebble beach...
Dip Your Toe In
Added a windsurfer charm which had been alcohol inked, attaching it with a brad. Another wavy line peel off (am I feeling alright?!) and this one was done!
The Gene Pool
My favourite I think - attached an alcohol inked sea conch charm using a mini micro brad, and added the phrase "The problem with the gene pool is that there is no lifeguard" - the final touch was a few of those rustic gold glass chips.
The Master Calls a Butterfly

You can never have too many bags, hats or shoes!

Flirty Dress!

Posh Frock
These ATCs are fairly simple: wide piece of pink ribbon, mulberry paper over one corner (you know me and my corners!), the words fun and sassy (DCWV paper methinks), a length of tape measure (all us girlies know about measuring up!) and for the focal point... stickers *shudder*
Had to jazz them up with gems, fibers, flowers, and the final touch, thanks to my FDF, the charms! Which I faffed with of course, and alcohol inked them, attaching a ribbon through the loops before using brads to hold them in place on the ATCs.
Phew, that was pretty stressful. Especially as the deadline is Monday, and they are for ATC Addicts which I co-own with my FDF, and I still have waterfall ATCs to do! What with moving, somehow time for crafting got shoved aside for a while, then wham bam, I've got deadlines looming! Thank goodness my creative muse was by my side today :D

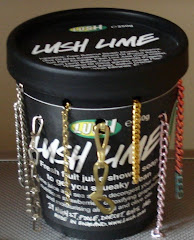
Added "Paris" word charm and ribbon to the lid...

Added pearly buttons to the bottom half...

Attached my Eiffel Tower tag with ribbon...
Ta da!!!

 Posts
All Comments




| My Birthdate: August 16 |
 You're incredibly introverted and introspective. You live inside your head. You spend a lot of alone time meditating and thinking. People see you as withdrawn, and at times they are right. You are caring and deep, but it may be difficult for you to show this side of yourself. Your strength: Your original approach to thinking Your weakness: You tend to shy away from others Your power color: Pale blue Your power symbol: Wavy line Your power month: July |
| My Brain's Pattern |
 Your mind is a multi dimensional wonderland, with many layers. You're the type that always has multiple streams of though going. And you can keep these thoughts going at any time. You're very likely to be engaged in deep thought - and deep conversation. |
| You Are 1: The Reformer |
 You're a responsible person - with a clear sense of right and wrong. High standards are important to you, and you do everything to meet them. You are your own worst critic, feeling ashamed if you're not perfect. You have uncompromising integrity, and people expect you to be fair. At Your Best: You are hopeful, honest, and inspiring. You bring out the best in humanity. At Your Worst: You are intolerant, judgmental, and picky. Your Fixation: Resentment Your Primary Fear: Being corrupt. Your Primary Desire: To be good. Other Number 1's: Al Gore, Martha Stewart, Gandhi, Celene Dion, and Spock from Star Trek. |
| What My Name Means |
 You are well rounded, with a complete perspective on life. You are solid and dependable. You are loyal, and people can count on you. At times, you can be a bit too serious. You tend to put too much pressure on yourself. You are usually the best at everything ... you strive for perfection. You have the classic "Type A" personality. You are very intuitive and wise. You understand the world better than most people. You also have a very active imagination. You often get carried away with your thoughts. You are prone to a little paranoia. You sometimes go overboard in interpreting signals. You are friendly, charming, and warm. You get along with almost everyone. You work hard not to rock the boat. Your easy going attitude brings people together. At times, you can be a little flaky and irresponsible. But for the important things, you pull it together. You are a naturally creative person. Ideas just flow from your mind. A true chameleon, you are many things at different points in your life. You are very adaptable. You tend to be pretty tightly wound. It's easy to get you excited... which can be a good or bad thing. You have a lot of enthusiasm, but it fades rather quickly. You don't stick with any one thing for very long. You have the drive to accomplish a lot in a short amount of time. Your biggest problem is making sure you finish the projects you start. You are wild, crazy, and a huge rebel. You're always up to something. You have a ton of energy, and most people can't handle you. You're very intense. You definitely are a handful, and you're likely to get in trouble. But your kind of trouble is a lot of fun. You are influential and persuasive. You tend to have a lot of power over people. Generally, you use your powers for good. You excel at solving other people's problems. |


